
Ubuntu as a home server. Part 1. Dynamic DNS.
- modified:
- reading: 4 minutes
Recently I spent some time with my old Desktop PC to configure it as my home server: OpenVPN, File Share, TimeMachine Server, VMware Server with several Windows Machines (it is old Desktop, but still powerful). Just to make sure that I will not forget what and how I did that I will document it in next articles:
- Dynamic DNS.
- OpenVPN.
- AFP Server (for OS X).
- SMB server (for Windows and Linux).
- Reliability (Backups).
Dynamic DNS
First of all it is good to have access to the home network from outside. Let’s assume that you own domain name example.com (which you use to host some website or maybe email server) and you want to have access to home network by name home.example.com. Because your Internet provider probably does not give you an Static IP you need to setup a Dynamic DNS.
Most routers have support for Dynamic DNS services out of box. My router also supports some of them, but none of them are free.
Namecheap
In my case I use Namecheap as a DNS provider for example.com. If you bought your DNS name somewhere else you can transfer it to Namecheap or just use Free DNS service from Namecheap.
One advice, if you own domain example.com you can register Free DNS record home.example.com and enable Dynamic DNS only for this record. I believe that this is more secure. In that case if somebody will hack this DNS record they will not get access to the whole domain, only subdomain home. So basically you will have registered example.com name as a Free DNS record (or domain record if you bought it on Namecheap) and vpn.example.com as a separate Free DNS record. And only for second record you should enable Dynamic DNS (in screenshot below I set up domain name vpn.example.com)
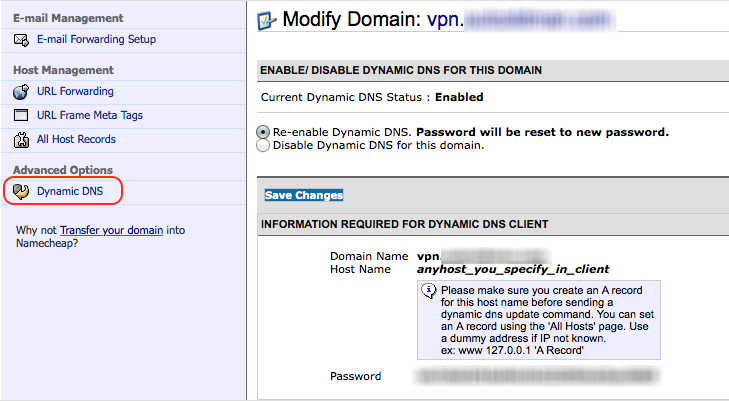
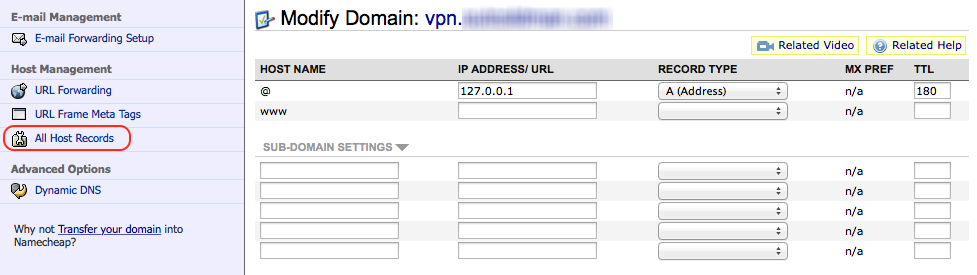
On All records page prepare records to be set via Dynamic DNS client, make sure that record @ has type A (Address) and point it for now to address 127.0.0.1
Dynamic DNS client - ddclient
After that you can install ddclient on your home Ubuntu
$ sudo apt-get install ddclient
Modify your ddclient.conf file
$ sudo vim /etc/ddclient.conf
With configuration
daemon=3600
pid=/var/run/ddclient.pid
ssl=yes
use=web, web=checkip.dyndns.com/, web-skip='IP Address'
protocol=namecheap      \
login=vpn.example.com        \
password='PasswordFromScreenshotAbove'     \
@
Verify that configuration works
$ sudo ddclient -daemon=0 -debug -verbose -noquiet
At the end you should see something like
SUCCESS: updating @: good: IP address set to XXX.XXX.XXX.XXX
Restart/Start ddclient daemon with
$ sudo service ddclient restart
Multiple domains
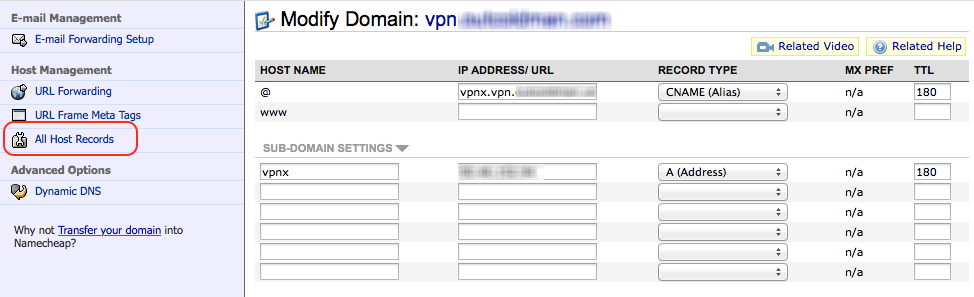
In case if you want to have more than one DNS record to point on your home server, for example vpn.example.com and public.example.com, you will need to do a small trick with host names. It is because ddclient expects to see only unique host names in configuration and in our case both of them have host name @.
In Namecheap account for each record add one more subdomain with unique name like vpnx and publicx (record type should be A (Address), and IP Address can be 127.0.0.1), change @ record to CNAME (Alias) which points to vpnx.vpn.example.com and publicx.public.example.com
After that you can change configuration to something like
daemon=3600
pid=/var/run/ddclient.pid
ssl=yes
use=web, web=checkip.dyndns.com/, web-skip='IP Address'

protocol=namecheap      \
login=vpn.example.com        \
password='PasswordForVPNExampleCom'     \
vpnx

protocol=namecheap      \
login=public.example.com        \
password='PasswordForPublicExampleCom'     \
publicx
Verify configuration
$ sudo ddclient -daemon=0 -debug -verbose -noquiet
Restart ddclient daemon
$ sudo service ddclient restart
Router
Configure your router (follow Router’s manual)
- As a suggestion change the DHCP lease type to Static in router settings for Ubuntu server. So your home server always will have the same Static IP address in home network.
- Forward ports which you want to Ubuntu server. In my case I forwarded ports 443 (standard HTTPS port) and 80 (standard HTTP port).
Test connection
On Ubuntu start simple web server to test that everything works
$ sudo python -m SimpleHTTPServer 80 ~/
Try to open page http://vpn.example.com in browser, you should see all files from your home directory. Don’t forget to kill this web server. You are ready for the next part Ubuntu as a home server. Part 2. OpenVPN..
Links
- Namecheap Knowledgebase → General Domain Transfer Steps and Tips
- Namecheap Knowledgebase → FreeDNS
- Namecheap Knowledgebase → Dynamic DNS
- Ubuntu Community Help Wiki → Dynamic DNS