
Moving emails to FastMail
- modified:
- reading: 10 minutes
For the last 10 years I used various mail providers: mail.ru, Google Mail, Outlook (previously Live Mail), Office 365. They all have good and bad parts, but recently I made my decision to move from Google Mail/Outlook to FastMail
- The main reason: I need easy way to set up email addresses for pet projects, something like
support@example.com. I useddomains.live.comfor that, but recently Microsoft closed this free feature (you can keep old accounts, but cannot create new accounts anymore). - Sometimes I use web version to access my emails. Not having ads is a good thing.
- Privacy. I don’t have anything in my emails what I really need to hide, but at the same time I don’t like that Google and Bing can use my emails for Advertising purposes.
- Now I use FastMail to handle all of the old Email accounts, like Google Mail and Outlook, all my custom domain accounts for pet projects and all my personal emails. One place to combine all my email accounts in one is a good thing as well.
Why FastMail?
Short answer: easy to setup, easy to use, 60 days trial, not expensive (I’m looking on $40/year for 15Gb), multiple domains and aliases. Also it has good reputation and recently it became independent company again (see FastMail profile on crunchbase). It seems like a good thing, which shows that these guys are very seriously will continue to do what they do for the last 10 years.
I tried other solutions as well.
OS X Server
At first I really thought about setting up my own email server. I used for some time my own home server with OS X Server, also I wanted to try something in the cloud with one of the Open Source or paid solutions.
Own mail server with OS X Server worked really well. I used Dynamic DNS service from Namecheap and my own custom certificate to secure connection. The only one problem I had that my Internet provider (Frontier) blocks outgoing port 25, which is used for sending emails from SMTP server. Workaround is to forward all emails through their SMTP server, but… It does not feel right for me.
If you don’t have issues with outgoing port - I would recommend to try OS X Server, especially if you have in your family a lot of Apple devices. Easy to setup and works really well.
Own Mail Server in the Cloud
I tried to setup various solutions on VPS in the cloud. One of the solutions was open source iRedMail with RoundCube, the other solutions was Open-Xchange (this one is paid solution). Both of them are ok, but I was not satisfied. First of all - having own mail server takes a lot of your time (configuration, updates, spam lists). Also at minimum you will need to pay $10/month for VPS hosting.
Email services
There are a lot of options: Google Apps for Business, Office 365, Zoho Mail. I looked and compared all of them. But after I met FastMail I liked it for simplicity and set of features it provides.
I honestly don’t want to write comparison list between all of these services. They are all good. If you are looking something for yourself, just choose whatever you like more from first impression and verify that it has all the features you need.
FastMail
Registration
To start using FastMail obviously you need to register new account (you can use my referral link to do that). If you are going to try Personal Trial account you will need to register account on one of their domains, for example fastmail.fm (they have a lot of options). If you are going to use your own domain - it does not really matter which one you are going to choose, you will use it only for signing in. Just for example, let’s say that you have registered example@fastmail.fm.
Settings
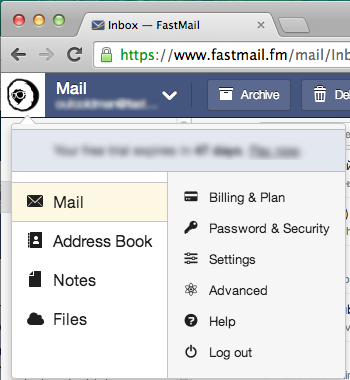
One thing was not really obvious for me, that in main menu there are two links for settings: Settings and Advanced. I automatically for 5 minutes kept clicking on Settings link and trying to find Advanced settings somewhere in Settings window before I realized that I need to use separate menu item Advanced
Virtual Domains
I started my configuration from Virtual Domains (Advanced -> Virtual Domains). This is the first step of setting up emails on your own domain. At first you just need to add domain names which you own to the list, let’s say that you own example.com - just add it to the list

Subdomains is the first awesome feature which you are going to get from FastMail. For example, if you want to use email me@example.com and also you want to have separate emails with specific identifiers for various services like me+dropbox@example.com or me+mybank@example.com - you will meet a lot of services which do not allow you to use + in email alias. FastMail has a solution for this, it can automatically swaps mybank@me.example.com to me+mybank@example.com and sends emails to me@example.com. You can specify this per domain.
The other part, which you need to specify on this page is the list of aliases you want to use for each domain. For example if you have domain example.com and you want to use email me@example.com just add record me @ example.com target to example@fastmail.fm

After that you will need to go to the DNS provider where you bought domain name and do either
-
Set up only MX (mail exchanger) records to point to FastMail servers (verify that these are the latest recommended settings).
in1-smtp.messagingengine.com in2-smtp.messagingengine.com -
Use FastMail name servers for domains. This means that FastMail will have whole ownership over your domain. It automatically setups MX records and also gives you an option to specify other DNS records if you need.
- Namecheap - How can I change the nameservers for my domain?
- GoDaddy - Setting Nameservers for Your Domain Names
I decided to keep using Namecheap and GoDaddy nameservers for the real web sites and transfer all other which only have Redirect 301 records. For example my domain outcoldman.com is still using Namecheap name servers (and I only specified MX records for it which point to FastMail), but outcoldman.ru is using FastMail name servers, because I don’t expect a lot of configurations for it.
For additional information you can read official FastMail documentation page How to set up email for your own domain.
Give it some time to propagate all settings and after that you can try to send emails to your own email addresses. You can also use terminal command on OS X
dig -t MX example.comto verify that MX records are set correctly.
Web site and Redirects
With the FastMail account you also get 5Gb of storage (for $40/year) which you can use for Static WebSites or some picture galleries. But just be aware that your account has limits for the uploading/downloading files from your file storage. So if your website is very popular - FastMail storage is not a right place for hosting it.
If you will go to the Advanced -> Websites/Redirects - this is where you also can setup redirects, like in my case I have a redirect from outcoldman.ru to outcoldman.com (just a reminder that outcoldman.com is still hosted by Namecheap, so Namecheap knows where the real location of my website). These, for example, two records I have

If you want to know more about WebSites and File Storage you can read official FastMail documentation page How to set up a website.
If you decided to use FastMail name servers for some of your domains and you need to specify DNS records you can do it on
Advanced->Custom DNSrecords. As I said in my case I kept all real web sites with name servers where I bought it, so I did not need to setup it with FastMail.
Migrate IMAP
FastMail also gives you a very easy way to migrate all of your old emails from other accounts by using IMAP. This is one time operation. To do that go to the Advanced -> Migrate IMAP.
In case if you are using Google Mail - you will need at first to enable IMAP in your Google Mail account (I believe that it is disabled by default)
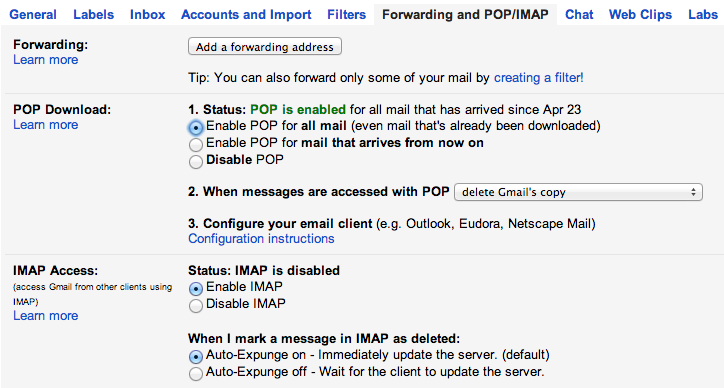
And after that specify Google Mail IMAP settings (you can get them from Get started with IMAP and POP3)
Server: imap.gmail.com
Port: 993
Requires SSL:Yes
User Name: your full Gmail address
Password: your Gmail password
If you are using Outlook I believe that you don’t need to specify anything in your Outlook account, just use next settings (you can get them from Set up an email app with Outlook.com)
Server address: imap-mail.outlook.com
Port: 993
Encrypted Connection: SSL
User name: Your email address
Password: Your password
Specify also all other settings you want, like which folder you want to use for import.
After that just click Migrate button and wait. At the end of migration process you should get email on your FastMail account IMAP Migration report with the detailed information about migration process.
After that I’ve deleted all migrated emails in Outlook and Google Mail accounts, because now I have all of them in FastMail.
One Email to rule them all
The next important part which will help you to forget about all other Email accounts on other services: setup FastMail to periodically fetch emails from other accounts using POP3. After that step you also can answer on emails using your old Email Accounts like Google Mail or Outlook directly from FastMail.
You can do it in two ways. Advanced way is to use Advanced -> Pop Links. The easiest one is to use Settings -> Accounts. I used the easiest way. Go to the bottom of the page Settings -> Accounts and just add all of your other Email accounts, like Google Mail, Outlook, your Internet Provider email and anything else you want to work with

It will also ask for the POP3 settings, which you should find at your email provider (use links above for the Google Mail and Outlook accounts).
When you register new trial account with FastMail it asks you to specify one of the old Email accounts. In my case it was my Google Mail account. You will probably find it in the list of the Accounts on Settings page. But FastMail on registration does not setup POP links for this account. And it does not allow you to specify this account second time on this page. The easiest way which I found is to just remove this account and add it back.
Other small tricks
- You will not find some folders in Web interface, which maybe you liked in Outlook or Google Mail, like Unread or Pinned. Don’t worry, it is easy to fix. Just search for
is:unreadandis:pinnedon Web interface and save these searches as Unread and Pinned. - To find out how to setup Email applications you can visit page Set up your email client. In case of Mail.app it is very easy to add your other email addresses (see Adding your other email addresses section). But it seems like Android client allows you to use only one email address. And you probably don’t want to use default FastMail email address
example@fastmail.fm, so on the 2nd step from the manual specify Email which you want to use for responsesme@example.comand on step 4 specify your FastMail user name for authentication. - Calendar is in Beta at current moment. If you want to use it, you can read this blog post Calendar now available on beta.fastmail.fm for testing. You can easily configure CalDAV on your device to use it in Mail/Calendar applications.
- Also you can configure your device to use FastMail address book using LDAP, but it will be available in read-only mode on your device. Read more on page Server names and ports
- You can download all your emails using
Advanced->Mass delete/Download/Remove duplicates.
That is all for now. If you are considering to use FastMail as your email service and you want to register new account you can use my referral link.